The emergency button still exists the case doesn't show it. It's also still possible to press itI like the design, although I'm surprised it's not alot smaller.
I've a pertinent question though, Why did they get rid of the emergency button.
I've only ever used it by accident myself, so anybody................
8
You are using an out of date browser. It may not display this or other websites correctly.
You should upgrade or use an alternative browser.
You should upgrade or use an alternative browser.
Golf 8 Key Fob - cover fitting
- Thread starter p.eTSI
- Start date
Michael gti07
Go Kart Newbie
Actually, one of my favorite options is touching the inside and outside of the doorhandle (fronts only) to unlock/lock the doors.It’s probably a very similar size to the key fobs of many other car manufacturers. Maybe the fob’s considered by VW to be the optimum size to be easily found if it’s carried in a bag where it might become ‘buried’ under the bag’s other contents - important for owners without keyless entry to be able to locate their key fob easily as they need to use it to lock / unlock the car; if it were smaller it could be more difficult to find. It also needs to be large enough to accommodate essential components - RFID transponder chip, circuitry, antenna (I have no idea how much space those components take up), button cell battery and key blade.
I‘m not 100% certain, but I don’t think VW key fobs in the UK have ever had an emergency button. I’ve owned VW’s for just over 20 years and none of them have had a key fob with an emergency button.
(Well, that and enabling windows up or down with the fob).
You don't use the unlock on approach ?Actually, one of my favorite options is touching the inside and outside of the doorhandle (fronts only) to unlock/lock the doors.
(Well, that and enabling windows up or down with the fob).
One of the first things we disabled. So annoying!You don't use the unlock on approach ?
Agree; glossy piano black seems a strange choice for a key fob, bearing in mind how easy it is for it to become scratched.
Back to your predicament - you could try the following - it might need an extra pair of hands to help hold the cover in place as you refit it;
Good luck!
- Starting with the corner marked ‘x’ on your picture below, Insert that corner into place on the fob and then work outwards in the direction of the arrows from that corner. I’d suggest using something like the tip of the blade of a small flat bladed screwdriver (e.g. electrical screwdriver, watchmaker’s screwdriver or similar) if necessary in the recessed channel on the cover to help push it back into place. Use the extra pair of hands to hold the partially refitted cover in place as you continue working around the edges as it’ll leave you with both your hands available to work the remainder of the recessed channel on the cover back into place with the help of the screwdriver blade. The corner of the cover that I‘ve circled in your the picture looks as if it has a small cut out in the recessed channel, so leaving that corner until last should mean it’s hopefully easier to manipulate it back into place.
- If the above isn’t successful, then you could;
- warm the cover first as @Braxton has suggested to make it more flexible or
- smear a very very thin layer of something like washing up liquid - or similar product with lubricating properties - along the recessed channel around the edge of the cover first to make it easier to push the edge of the cover back into place. If you decide to do this, I’d stress the importance of using any lubricant very sparingly to minimise the risk of there being any excess lubricant getting inside the key fob casing and potentially causing irreparable damage to internal components e.g. semiconductors, electrical connectors, the battery.

It might not work and trying this method is at your own risk, but it could be worth trying.
Please update this thread if it’s successful.
View attachment 263514
Thank you VERY much for taking the time out to reply so comprehensively. Much appreciated!
I did think about the lubricant approach but will leave it as a last resort due to the risks you point out. I can't imagine a fob replacement is cheap.
We easily manage to get one 'long side' in using our fingernails but once its in, the other 'long side' has little change to slot in due to no 'slack' being available as the opposite side is pressed in. Will - as you point out - need to try a slim flat head to see if we can force it in.
Will update here if we are successful!
We do have an upcoming service so if all fails will have to ask them to address it - hopefully not at cost - but by todays over priced standards I wouldn't be surprised if they charged 'labour' for it...
What happens?One of the first things we disabled. So annoying!
Just not reliable, plus seems to keep locking/unlocking in a confused manner.What happens?
There was a thread here but seems to have since been edited for reasons unclear:
https://www.golfmk8.com/forums/index.php?threads/unlock-upon-approach.393424/
Another thread with video here:
https://www.vwidtalk.com/threads/car-locks-itself-when-approached-from-nearside-passenger-side.3593/
Also there was an argument around this being a security risk for car jacking. But that's for another thread, separate to this thread topic.
An amusing update.
The car went in for it's first service, and so we kindly asked if anyone could fit the rubber piece that had come away from the fob.
Citygate VW (The UK's leading Volkswagen, ŠKODA, SEAT, CUPRA & Kia dealer with 19 Locations across London & the South East.) wanted £351 (three-hundred-and-fifty-one Great British Pounds) to do this. Their method being: we don't know what to do so will order a new fob, charge you for it, and then charge you to programme it to the car.
Yikes.
Hi, I don't know if you managed to fit it by now, but here is what I did.
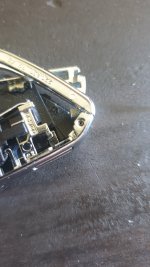
In order to fit that rubber easy you need to take the silver trim apart.
To do that you must extract the locking pin, either by pushing it from the other side or using a very fine extractor for that. I didn't had such fine extractor so I drilled a 1mm hole and then pushed it out.
You can see in the pictures here:
Thanks for your post - it's super helpful! I did not expect anyone else to face the same situation - what made your cover come off?Hi, I don't know if you managed to fit it by now, but here is what I did.
In order to fit that rubber easy you need to take the silver trim apart.
To do that you must extract the locking pin, either by pushing it from the other side or using a very fine extractor for that. I didn't had such fine extractor so I drilled a 1mm hole and then pushed it out.
I have not observed the locking pin before, I will take a look. Naturally am hesitant to drill any holes!? and don't have the facility to so at 1mm.
Did yours go back together easily following your final pic where everything is in pieces...?
Yes, it all goes perfect back to original state. Don't be confused, the hole is only for allowing me to push the locking pin, I didn't drill the pin itself.
The hole is covered at the end by the rubber, so no issues there.
I used a Dremel for making the hole, that is all plastic so it's easy to do it.
I removed mine intentionally, I wanted to reach the PCB, but that's not possible without cutting in the plastic.

The hole is covered at the end by the rubber, so no issues there.
I used a Dremel for making the hole, that is all plastic so it's easy to do it.
I removed mine intentionally, I wanted to reach the PCB, but that's not possible without cutting in the plastic.
Superb pictures and instruction Malek, I did the same and it worked perfectly. No way the rbber cover can be replaced without doing your process here. Thanks for the pictures, instructions and your time.Yes, it all goes perfect back to original state. Don't be confused, the hole is only for allowing me to push the locking pin, I didn't drill the pin itself.
The hole is covered at the end by the rubber, so no issues there.
I used a Dremel for making the hole, that is all plastic so it's easy to do it.
I removed mine intentionally, I wanted to reach the PCB, but that's not possible without cutting in the plastic.
View attachment 270211