****EDIT, installing the BFI stage 1 dogbone insert did absolutely nothing, which became apparent after break in. Disregard my remarks about that below. That insert won’t do much tightening things up but definitely increases NVH in reverse. I left it in place for now*****
Alright, so reporting back. The goal for me was to just install the BFI stage 1 dogbone insert, nothing else, and hopefully tighten up all the slack for a smoother ride and less of that forward/backward rocking movement.
I’ll say, after installing the dogbone insert, the movement decreased by 50%, which is great but not exactly where I would like it to be. And I’ll have to see how it holds up over time and changes in temperature with the seasons, but it definitely made a significant difference when accelerating/decelerating at slow speeds where naturally there is more engine movement, shifting throughout the gears, etc.
Commenting on the NVH, yes, it definitely adds some as noted by others, especially in reverse and idle. And also, I can feel the vibrations in the clutch pedal. Basically, if you have a single mass flywheel and have clutch chatter, it will amplify the clutch chatter but I don’t feel the cabin vibrating or anything crazy like that. I was never bothered by clutch chatter, and with the amplified chatter, it still is completely tolerable.
Now for actually installing the insert:
Got the car on 4 stands (jack also used on the subframe as a 5th point of support which I highly recommend) and put car in neutral to loosen any tension as noted by others.
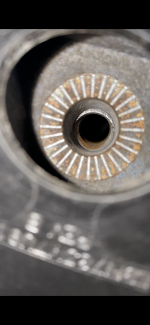
With the dogbone mount bolt still in place, I used silicone lubricant from autozone, sprayed heavily both inside the dogbone bushing where the dogbone insert gets installed and all over the working surface of the insert. Slid right into place. Barely even needed a mallet. Next, breaking loose the dogbone mount bolt - I used a breaker bar and the handle on my floor jack to get more leverage. Bolt out, noticing immediately that in came out kind of at an angle, which is important to note - nows when I was like dang the new bolt is gonna be tough to get in because something is probably out of alignment.
I was right. Soooo, new bolt wasn’t threading in because the opening hole in the black dogbone mount arm was not aligned with the hole coming from the bushing and with the hole that has the threads (see picture attached). I’ll say trying to rock the motor or trans or dogbone mount arm alone did not do it, but a pry bar between the dogbone mount arm and the subframe (where the arm meets the subframe) spreading it, used my free hand to grab the dogbone arm and push it towards the rear of the car. That was the way. I feel like this pry location is kinda different than what others have shown in tutorial videos like DAP, etc. Keeping tension on the pry bar at this spot with one hand, and threading in the bolt/spacer/large washer with the other, and torquing it down. Finally done.
Next what I’ll probably do are the motor and trans mounts, see if things tighten up a bit more. If not, guess I’m gonna consider replacing the dogbone mount bushing to one of those performance options.